On the other models I have made so far I have become accustomed with being able to get away with just using a spray of Humbrol's acrylic paint as a base layer. This is a fudge and not really good practise I suppose, as the following results show...
Technique 1 - Green Tank (Masking tape method)
Really you should prime plastic models with a good enamel primer - something like Halford's automotive spray paint is good (in a colour to your liking). Not doing so was my downfall in this case as the very cheap greasy plastic used for these toys (similar to that used for soft plastic toy soldiers) is very choosy about what paints you can use with it and using the wrong paint can result in flaking...
 |
| Peeling off the masking material also - annoyingly - peeled of bits of my base paint. |
In this case I removed the first set of masks after spraying on the grey pattern over the base green layer. So, next, I will re-mask ready to spray the final brown pattern.
Technique 2 - Grey Tank (BluTack method)
Because the BluTack method means I do not remove any of the masks until all the colours have been applied I did not notice my flaking problems right until the end.
What I decided to do - on both models - to rectify the flaking paint problem was to simply touch up the patches where the plastic was showing through by slapping one a bit of paint. Not idea but I am banking on not having this same problem on future models by using an enamel base.
 |
| The paint peeled off with this BluTack method too - but I then touched up the model with the closest shade of acrylics that I had to hand. |
Unfortunately, where I had to touch up the paint job I lost some of the soft-edged effect, so it's a little shoddy now. (Also, just to get the job done, I used whatever colour I had to hand, so they weren't an exact match for the Vallejo Model Air colours...Another lesson, which I will discuss next.)
Lessons learned
OK, from this part of the experiment I learned a few things, which I will rectify when it comes to doing the real Finnish tank models.
• Correct Priming: I need to correctly prime my projects with enamel to prevent chipping and flaking while masking.
• Colour matching for touching up: Because I am using Vallejo's Model Air colours for air-brushing - rather than thinning down normal acrylics - I have to make sure I buy the complementary Vellejo Model Colour so I can touch up any bloopers or smudges.
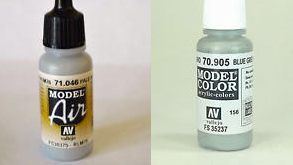 |
| Vallejo Model Air is made specifically for air-brushing and is a pre-thinned paint, so if you want to touch up or brush paint you should buy the equivalent colour in their Model Color range to match. |
• I preferred the hard-edged effect [1], I think this was closer to the original Finnish schemes.
• I like the colours on the Green Tank [1] better so far, the Grey Tank [2] colour are a bit dark in my opinion.
Tank 1 - 'Green Tank' - Finnish colour scheme:
Base 'Moss Green' - Humbrol's Light Olive Matt [86]
Camo Grey - Vallejo's Pale Blue Grey [Model Air 046/Model Color 907]
Camo Brown - Unfortunately I couldn't managed to get just the right brown 'out the bottle' (I tried have a dozen different browns from the Vallejo range), so I'm having to mix two colours. These are: [941] Burnt Umber and [822] German Camo Black Brown. Hopefully I can thin this for airbrushing.
Next...
So, I still have to finish off the Green Tank test and I think I will try a light coat of varnish before applying the final mask. Hopefully this will protect the current layers and will prevent chipping when I remove the next mask. Fingers grossed.
No comments:
Post a Comment